Difference between revisions of "Lost Island - Natla's Mines"
From WikiRaider
(New page: {|{{leveltable}} !{{levelline}}|''Lost Island - Natla's Mines'' |- |align="center" colspan="3"|225px |- !{{levelline}}|Tomb Raider Anniversary |- !align="l...) |
m (formatted according to the sample levels page) |
||
| (5 intermediate revisions by 3 users not shown) | |||
| Line 1: | Line 1: | ||
| − | {| | + | {{Remark|the level|Lost Island - Natla's Mines|in [[Tomb Raider Anniversary]]||about the level in [[Tomb Raider I]]|Natla's Mines|}} |
| − | + | {{Infobox Level | |
| − | | | + | | Name = Lost Island - Natla's Mines |
| − | + | | Image = Natlasminestra.jpg | |
| − | | | + | | Game = Tomb Raider Anniversary |
| − | + | | Section = [[Lost Island Section (TRA)|Lost Island Section]] | |
| − | | | + | | Levelno = 12 |
| − | + | | Length = 1 | |
| − | | | + | | Gametime = |
| − | | | + | | Timetrial = 17 Minutes |
| − | + | | Firsttime = | |
| − | + | | Secrets = 1 [[Relics (Tomb Raider Anniversary)|Relic]], 4 [[Artifacts (Tomb Raider Anniversary)|Artifacts]] | |
| − | + | | Special = | |
| − | + | | Location = [[Lost Island]], [[Atlantis (Location)|Atlantis]] | |
| − | | | + | | Chrono = 1 |
| − | + | | Previous = Egypt - Sanctuary of the Scion | |
| − | + | | Next = Lost Island - The Great Pyramid | |
| − | + | | Adjacent = | |
| − | + | | Wtlink = tra/atlantis | |
| − | + | }} | |
| − | | | + | '''Lost Island - Natla's Mines''' is the twelfth level in [[Tomb Raider Anniversary]] and the first in the [[Lost Island Section (TRA)|Lost Island Section]]. |
| − | |||
| − | |||
| − | | | ||
| − | | | ||
| − | |||
| − | |||
| − | |||
| − | |||
| − | + | == Story == | |
| + | {{mainarticle|Tomb Raider Anniversary Story}} | ||
| + | Lara has hitchhiked a ride from [[Jacqueline Natla]] and followed her to the [[Lost Island]]. She must stop [[Jacqueline Natla]]'s evil intentions of using the [[Scion]]. | ||
| + | However, her task gets a bit complicated as Lara's weapons have been taken away from her. So, the first task is to reclaim the trusty [[Dual Pistols]] - and then confront [[Larson Conway]], [[Jerome Johnson]] and [[Kold Kin Kade]] one by one. | ||
| + | <!-- ===Cutscenes=== --> | ||
| + | <!-- ===End Cutscene=== --> | ||
| + | |||
| + | ==Objectives== | ||
| + | * Find three fuses, a [[Red Fuse]], a [[Green Fuse]] and a [[Blue Fuse]] | ||
| + | * Use the fuses to get back the [[Dual Pistols]] | ||
| + | * Defeat [[Larson]] | ||
| + | * Use the mining drill to proceed in the level | ||
| + | * Defeat [[Kold]] and [[Kid]] | ||
| + | * Make your way along the pyramid's wall to open the entrance to the [[Lost Island - The Great Pyramid|Great Pyramid]]. | ||
==Finds== | ==Finds== | ||
| − | + | === Secrets === | |
| − | + | In this level you can find one [[Relics (Tomb Raider Anniversary)|Relic]] and four [[Artifacts (Tomb Raider Anniversary)|Artifacts]]. | |
| + | * [[Relics (Tomb Raider Anniversary)|Relic]]: [[Chalice of Torment]] | ||
| + | : The [[Chalice of Torment]] is located in a crate hanging from the ceiling of the beginning area, the section of the mine with the pool of water and a boat. To get it, Lara must go back there after getting her [[pistols]] back, climb up to a section of a ledge where she an shoot the right side one of the two hanging crates. This makes it drop, revealing the relic inside. | ||
| + | |||
| + | === Tools === | ||
| + | * [[Red Fuse]] | ||
| + | * [[Green Fuse]] | ||
| + | * [[Blue Fuse]] | ||
| + | |||
| + | ===Supplies=== | ||
| + | ====Weapons==== | ||
| + | * [[Dual Pistols]] | ||
| + | * [[Shotgun]] | ||
| + | * [[.50 Caliber Pistols]] | ||
| + | * [[Dual Mini SMGs]] | ||
| + | |||
| + | ====Goodies==== | ||
| + | =====First Aid===== | ||
| + | * 1 [[Small Medipack]] | ||
| + | * 4 [[Large Medipacks]] | ||
| + | |||
| + | =====Ammo===== | ||
| + | * 4 [[Mini SMG's Ammo]] | ||
| + | |||
| + | ==Enemies== | ||
| + | * [[Rats]] | ||
| + | * [[Larson]] | ||
| + | * [[Kid]] | ||
| + | * [[Kold]] | ||
| + | |||
| + | == Traps & Obstacles == | ||
| + | === Traps === | ||
| + | * [[Lava]] | ||
| + | |||
| + | === Obstacles, Triggers & Puzzles === | ||
| + | * [[Breakable Window]] | ||
| + | * [[Movable Crate]] | ||
==Typical Scenery of the Level== | ==Typical Scenery of the Level== | ||
| − | + | <gallery> | |
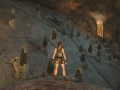
| + | Image:Natlasminestra.jpg|First Cave | ||
| + | Image:Natlasminestra2.jpg|Mines (Crane) | ||
| + | Image:Natlasminestra3.jpg|Mines (Control Centre) | ||
| + | Image:Natlasminestra4.jpg|Lava Room | ||
| + | Image:Natlasminestra5.jpg|Pyramid's Exterior | ||
| + | </gallery> | ||
[[Category:Levels]] | [[Category:Levels]] | ||
[[Category:Tomb Raider Anniversary]] | [[Category:Tomb Raider Anniversary]] | ||
| + | |||
| + | [[de:Verlorene Insel - Natlas Minen]] | ||
Latest revision as of 15:31, 12 August 2013
| Lost Island - Natla's Mines | |||
|---|---|---|---|

| |||
| Tomb Raider Anniversary | |||
| Section | Lost Island Section | ||
| Level No | 12 | ||
| Length (*) |
| ||
| Secrets | 1 Relic, 4 Artifacts | ||
| Location | Lost Island, Atlantis | ||
| Level Chronology: | |||
| Egypt - Sanctuary of the Scion | Lost Island - Natla's Mines | Lost Island - The Great Pyramid | |
Lost Island - Natla's Mines is the twelfth level in Tomb Raider Anniversary and the first in the Lost Island Section.
Contents
Story
- Main article: Tomb Raider Anniversary Story
Lara has hitchhiked a ride from Jacqueline Natla and followed her to the Lost Island. She must stop Jacqueline Natla's evil intentions of using the Scion.
However, her task gets a bit complicated as Lara's weapons have been taken away from her. So, the first task is to reclaim the trusty Dual Pistols - and then confront Larson Conway, Jerome Johnson and Kold Kin Kade one by one.
Objectives
- Find three fuses, a Red Fuse, a Green Fuse and a Blue Fuse
- Use the fuses to get back the Dual Pistols
- Defeat Larson
- Use the mining drill to proceed in the level
- Defeat Kold and Kid
- Make your way along the pyramid's wall to open the entrance to the Great Pyramid.
Finds
Secrets
In this level you can find one Relic and four Artifacts.
- The Chalice of Torment is located in a crate hanging from the ceiling of the beginning area, the section of the mine with the pool of water and a boat. To get it, Lara must go back there after getting her pistols back, climb up to a section of a ledge where she an shoot the right side one of the two hanging crates. This makes it drop, revealing the relic inside.
Tools
Supplies
Weapons
Goodies
First Aid
Ammo
Enemies
Traps & Obstacles
Traps
Obstacles, Triggers & Puzzles
Typical Scenery of the Level

First Cave

Mines (Crane)

Mines (Control Centre)

Lava Room
Pyramid's Exterior


