Difference between revisions of "Barkhang Monastery"
m |
|||
| Line 20: | Line 20: | ||
'''Barkhang Monastery''' is a level in [[Tomb Raider II]]. Lara reaches the Monastery described by the dying monk back in the [[Diving Area]], and by the use of the [[Seraph]] she gains access to the catacombs where the [[Talion]] lies, which opens the door to the [[Temple of Xian]]. | '''Barkhang Monastery''' is a level in [[Tomb Raider II]]. Lara reaches the Monastery described by the dying monk back in the [[Diving Area]], and by the use of the [[Seraph]] she gains access to the catacombs where the [[Talion]] lies, which opens the door to the [[Temple of Xian]]. | ||
| − | It is a common practice to not shoot at the monks, and they are the first time in Tomb Raider history that Lara encounters who are not hostile at her, with the exception of [[Winston]] | + | It is a common practice to not shoot at the monks, and they are the first time in Tomb Raider history that Lara encounters who are not hostile at her, with the exception of [[Winston]]. Also the monks will help Lara throughout the level by attacking the mercenaries who arrived there before Lara. Simply one shot at the monks will turn every inhabitant of the monastery against Lara, dramatically changing the difficulty of the level. However when the monks are busy fighting the mercenaries, a few stray bullets at the monks will sometimes be ignored. Due to the lack of availability to switch targets in the game's auto-aiming system, it's best for the player to just observe the battle and finish off the rest if the monks died. |
During the course of the level Lara travels around the monastery and surrounding mountains for five [[Prayer Wheels]], uncovered by the use of keys and gemstones, to gain access to the Seraph Chamber. The main tourist attraction of this level is the giant four-armed-Buddha statue, situated in the grand hall which serves as the central hub of this non-linear level. | During the course of the level Lara travels around the monastery and surrounding mountains for five [[Prayer Wheels]], uncovered by the use of keys and gemstones, to gain access to the Seraph Chamber. The main tourist attraction of this level is the giant four-armed-Buddha statue, situated in the grand hall which serves as the central hub of this non-linear level. | ||
Revision as of 03:58, 23 March 2011
| Barkhang Monastery | |||
|---|---|---|---|

| |||
| Tomb Raider II | |||
| Section | Tibet | ||
| Level No | 12 | ||
| Length (*) |
| ||
| Secrets | 3 | ||
| Location | Asia, Tibet | ||
| Level Chronology: | |||
| Tibetan Foothills | Barkhang Monastery | Catacombs of the Talion | |
Barkhang Monastery is a level in Tomb Raider II. Lara reaches the Monastery described by the dying monk back in the Diving Area, and by the use of the Seraph she gains access to the catacombs where the Talion lies, which opens the door to the Temple of Xian.
It is a common practice to not shoot at the monks, and they are the first time in Tomb Raider history that Lara encounters who are not hostile at her, with the exception of Winston. Also the monks will help Lara throughout the level by attacking the mercenaries who arrived there before Lara. Simply one shot at the monks will turn every inhabitant of the monastery against Lara, dramatically changing the difficulty of the level. However when the monks are busy fighting the mercenaries, a few stray bullets at the monks will sometimes be ignored. Due to the lack of availability to switch targets in the game's auto-aiming system, it's best for the player to just observe the battle and finish off the rest if the monks died.
During the course of the level Lara travels around the monastery and surrounding mountains for five Prayer Wheels, uncovered by the use of keys and gemstones, to gain access to the Seraph Chamber. The main tourist attraction of this level is the giant four-armed-Buddha statue, situated in the grand hall which serves as the central hub of this non-linear level.
Contents
Enemies
- Crows
- Fiamma Nera Killers
- Barkhang Monks (only if you shoot them)
Traps and Obstacles
Traps
Finds
See also
Typical Scenery of the Level
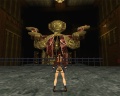
Buddha Statue
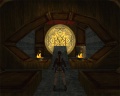
Final area

Corridor
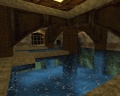
Pool


